Welcome to my blog!
If you've been here before, welcome back! Last month, I wrote about my experiences working on a bioinformatics project with some tips for those of you who are interested in data science. If you haven't read it yet, check out 'Story time: Bioinformatics research without a computer science degree'.
For this month, I'd like to write about one of the first steps (if not the first step) of working with new datasets: Renaming columns.
Below is a sample table to illustrate columns and rows.
Please note that for this post, we'll be following through the steps using Jupyter. If you are more familiar using other notebooks, feel free to use what you are comfortable with.
1) Open your notebook
You can find the screen below by opening the command prompt. First type in "jupyter notebook" then copy and paste one of the links generated below.
2) Open a new Python 3 notebook
Once you've opened Jupyter, have a look on the upper right corner. You should be able to see a button called "New". If you click on the New button, you should be able to see a menu of new notebooks, folders or files to open. To select a new Python 3 notebook, click on "Python 3".
The relevant buttons are highlighted in red.
3) Upload CSV UTF-8 file
First, download the dataset that you plan to analyze. Convert the file into a CSV UTF-8 format if necessary. I've found that CSV UTF-8 files are the easiest to upload and analyze using Python 3. Right next to the New button in 2), there is another button called "Upload". You can upload your new file using that button. The file should appear in the menu.
For this post, I will be using the file Injury statistics - work related claims: 2018 - CSV from Stats NZ.
4) Pandas library
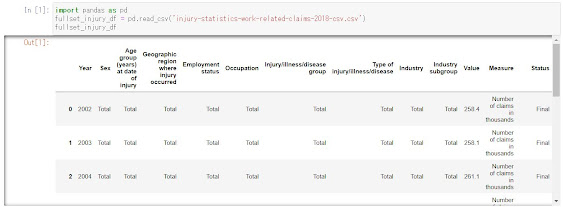
You can import the pandas library then rename pandas as pd when using functions from the pandas library. import pandas as pd
Then using the function pd.read_csv(), you can open the CSV file that was uploaded into Jupyter. It would make things easier to set a variable name for viewing the CSV file later on:
fullset_injury_df = pd.read_csv('injury-statistics-work-related-claims-2018-csv.csv')
5) View dataset
Have a quick look at the dataset. Take note of the columns and data described to have a good "feel" of the data. It might help figure out what kind of data analysis might be ideal.
6) Identify column names with symbols, and column names with spaces
Have a look at the dataset columns in 4). Can you find any column names with any symbols? Spaces even? These names can become problematic in the future because they will prevent you from being able to use the dot-notation to access the column.
Wait??? What is a dot notation?
Right. I guess I haven't mentioned it before in any of my past posts. Mmmm. I think a few images might help clear things up.
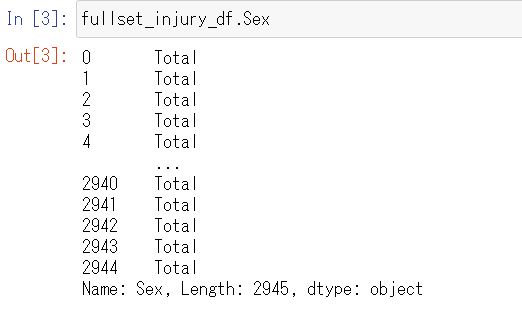
Here is an example of calling on a column using []. It's useful for any kind of column name.
Here is an example of calling on a column using the dot notation. It's another way of calling a column name.
When you try to read column names that have spaces or symbols using the dot notation, you get a syntax error.
Why not just use [] then? Why would it be necessary to change the column names?
To be honest, in most cases it would be straightforward to use [] to access a column. However, during my project I encountered a situation when Python 3 kept confusing one of my columns (which had a "." inside) as a file name and made it difficult to read the dataset properly. I found that renaming column names that can be accessed using dot notation can avoid such nuisances.
There are three conditions that must be met for column names to be accessed using dot notation:
A) The column name cannot be a number
B) The column name cannot include spaces
C) The column name cannot include symbols
There is an exception to C), as _ is acceptable.
7) Rename variable names
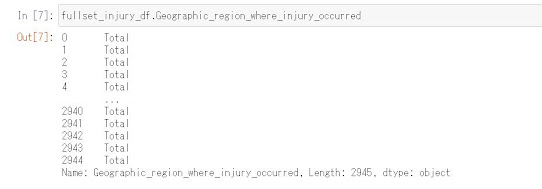
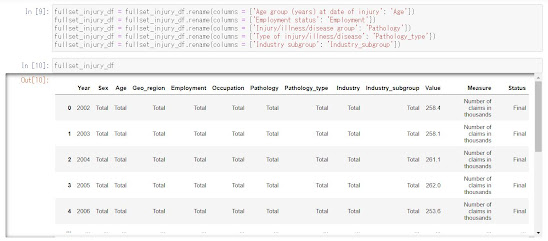
You can use the .rename(columns = {original column name: new column name}) to change the column name. In the example below, I changed the name "Geographic region where injury occurred" to "Geographic_region_where_injury_occurred" to replace the spaces with _.
Let's see if I could access the new column using the dot notation.
It worked! Now, Python no longer has a problem with accessing the new column name using the dot notation! But personally, I find the name takes up a lot of space in the table so I decided to shorten the name to "Geo_region".
8) THE END (or a new beginning?)
Follow the above steps, and you're on your way for the nitty gritty data analysis! This dataset only has 13 variables but some massive datasets can have 100s or 1000s of variables. While a relatively simple process, it can admittedly become tedious when dealing with massive datasets. However, it is an important step to avoid error messages later on. You don't want to get constant error messages! Believe me!!!
Final thoughts
I hope you enjoyed my new post and that it would help you get started with looking at new datasets😀 Many datasets have their own system in naming their columns, so hopefully this will help out with making sense of the data that you receive from other sources. What else would you like to know about datasets? If you're an experienced data scientist, I would love to know your thoughts. Please share your comments!
Next month, I'd like to focus on the neurodiversity portion of this blog. Let's explore a long-lasting question in the autistic community: Is autism a disability?
See you next month!!!


![Python 3 code [] notation. fullset_injury_df['Sex']](https://blogger.googleusercontent.com/img/b/R29vZ2xl/AVvXsEjALm83IHp3tzouvZeHTMm8beq9CZ1fb4mWA3f7N9Tk_HDRhxb89hODCR-T-I0ITFQN_-LFYYjlGWHsLTY0JAMN-vPpX_rKtRRBsYh7u9PdiJhpv7Gsn00s_GYREXFCI8wemaQFHz8Iqnq-/w581-h398/Sex_index.JPG)

![Different outputs: [] vs dot notation Input 4: fullset_injury_df['Geographic region where injury occurred'], Output 4. Input 5: fullset_injury_df.Geographic region where injury occurred, SyntaxError: Invalid syntax.](https://blogger.googleusercontent.com/img/b/R29vZ2xl/AVvXsEiw3J5VHJBalL3Y2LBNxt4V36R08XC04_Wv-zDx20MicyqpW6bUy8BCBvoXkoMulKYmvAe7euh8IORwGbfNxl1G-5Y9CNAyhvrasiUeQgf9jDqo9on90wzwQsGVjOt2w2OJBi7b1a3gdtzq/w562-h354/unreadable_gro.JPG)


